The content of the article
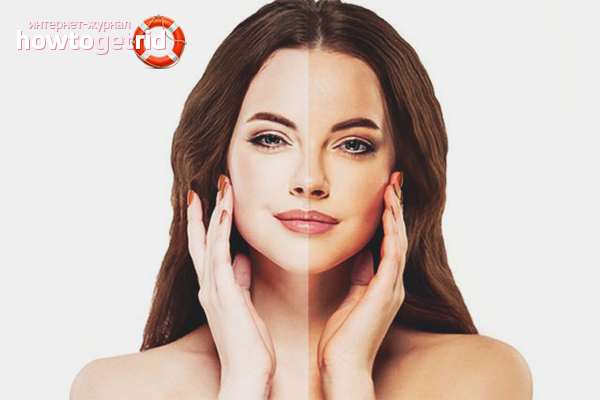
Not all girls have the opportunity to bask in the sun for hours to get their bronze tan. Due to the presence of contraindications to the harmful effects of ultraviolet radiation, many of them are in a constant search for alternative methods. One option is tanning. It allows you to get a great chocolate shade at home without visiting the solarium and trips to the sea. To achieve the result, it is important to learn how to apply the product correctly.
The benefits of tanning
- The cosmetic product does not leave burns, as when visiting a solarium or sunbathing.
- In addition to giving a bronze tint, tanning saturates the dermis with moisture, nourishes it, and fights against premature aging and wrinkles (if applied to the face and neck). Expensive cosmetic products are also designed to effectively combat cellulite.
- Tanning does not only give the skin a golden hue. It is able to even out defects if, after sunbathing, the body is tanned unevenly.
- The tool saves time. To get a tan using cosmetics, it will take 2-3 hours, in all other cases you have to languish in the sun for longer than 5 days.
- You can get a beautiful dark-skinned shade in any weather (rain, snow, etc.), when there is no desire to visit the solarium or there is no possibility of a trip to the sea.
- The use of tanning at home under the power of an unskilled person. To do this, just read the recommendations and clearly follow the instructions.
- In addition to the individual intolerance of the components and the presence of endocrine diseases, autosunburn practically has no contraindications. It can be used by pregnant (non-lactating!) Women.
- If something went wrong, auto tanning is easily washed off with folk methods. There is also the opportunity to eliminate oversights in a beauty salon.
Disadvantages of tanning
- On the human body there are many inaccessible places, which it seems impossible to process without the participation of a third party. Of course, you reach the back or the area behind the ears, but it is necessary to distribute the product evenly to exclude the leopard effect.
- The skin has a different type depending on certain areas. For example, your legs are dry, and your face, on the contrary, is oily. Because of this, a different shade of the skin is possible and, as a result, obtaining unwanted pigmentation.
- Most tanning beds have a pronounced unpleasant aroma, which is difficult not to notice. For these reasons, the procedure should be carried out in a ventilated room.
- The composition applied to the skin leaves marks on bedding and clothing. After the first 3-5 days, tanning begins to wash off, forming ugly spots.
- Depending on the initial skin tone, the product does not always give a bronze tint. On the streets of big cities you can meet girls whose skin tone is closer to yellow. It looks ugly and extremely suspicious, indicating certain diseases.
Instructions for applying tanning
Before proceeding with direct use, it is necessary to conduct a test for the presence of individual intolerance to the components. To do this, auto-tan a small area of skin on the wrist, upper part of the foot and back of the neck, wait 10 hours. After time, evaluate the result: if there is no irritation, itching, redness and inflammation, proceed with the procedure. If you are afraid that after the test sample the top layer will form stains, rinse off the tan with plenty of lemon juice.
Preparing to use tanning
A detailed instruction is attached to tanning, where the exposure time and the amount of application of the composition to each body area are clearly prescribed. Learn it. Many manufacturers also indicate the order of processing zones. There is a certain use algorithm for all available tanning products, we present it below.
- To more accurately predict the result after applying a tan 10 days before the procedure, stop using care products with alpha acids. Carefully study the column "Composition", there should not be components of AHA and AlphaHydroxyAcids. Such ingredients exclude the possibility of an even and correct shade.
- The day before the procedure, rub the skin well with a washcloth and carry out the procedure of scrubbing with hard abrasive particles. To prepare the composition, use the following recipe: mix 100 g. cane sugar with 100 gr. liquid honey, add 30 gr. crushed sea salt and 45 ml. castor oil. Combine the components, process all areas on which tanning will be applied. For the face, choose gentle peeling.
- After exfoliating keratinized particles, perform epilation or depilation. In the first case, the procedure must be done a day before using tanning, in the second - 10 hours. Be careful with hair removal, it is necessary to remove excessive vegetation by hair growth, nothing else.
- Before applying a tan, take a hot bath with salt and lavender essential oil. Wait 3 hours for the body to cool and moisture to evaporate from the upper layers of the dermis. Do not apply aerosols or deodorants to the body, do not use perfumes.
- For the procedure, you will need 2-3 hours. Make sure that you have such an amount of time, because you need to slowly cover your skin with tanning, strictly following the instructions. In addition to applying, it takes time to completely absorb and dry the tan.
Self-tanning
Prepare all the necessary materials in advance so that at the last moment you don’t run around the apartment looking for the right tools. For a successful procedure, you will need rubber or silicone gloves that fit tightly on your hands and follow all contours. It is also worth taking care of hairdressing clips or plastic hair crabs.
- Put on gloves, apply a little funds to your hand and rub it. The procedure always starts with the buttocks. Work your butt and hips in intense circular movements, slowly going down. The bikini area should not be completely processed; apply the composition only along the line of underwear.
- Pay special attention to the inner surface of the thigh; usually, the product does not lie uniformly on this area. Do not cover the area under the knees with a thick layer, otherwise the composition drains into folds and forms ugly strips. For the feet, carefully apply the product between the toes.
- Now go to the back and stomach (to the chest). From bottom to top, distribute the composition in an even layer, if necessary, seek help from a friend or use a mirror.
- From the back, slowly go to the shoulders, carefully treating the armpits. Come back to the neckline, also carefully treat the chest and clavicles. In these areas, the tool is especially noticeable. Self-tanning is applied to the hands from top to bottom along the growth of hair.
- Pin the hair with clips to free the area behind the ears. Put on a medical cap. Treat the back of the neck and the area behind the ears, move to the entire neck and face. To cover these areas, you need to use tanning, diluted with day cream. Mix them in a ratio of 80:20. Moisten a cosmetic swab in the composition and wipe the skin, distributing the product with a thin layer. Follow the border of the transition of the face to the neck and décolleté, if necessary, blend them with the usual body cream. Do not cover the lips and eye area.
- At the end of the procedure, wash your palms with baby soap or use a shower gel. Clean your nails with a special brush with fine bristles.
- Within 2 hours after applying tanning, do not wear clothing so as not to stain it. It is also not recommended to come in contact with interior items and bedding. You will have to go naked for a while, not lying down or sitting down.
- After this period, do not wear light clothing, especially close-fitting ones. Stitches will leave streaks on your body, breaking a uniform tone. In addition, to remove tanning from clothing implies certain difficulties.
- To avoid staining the skin, refuse to take a bath or shower for 7 hours after applying the composition. Do not be alarmed when once again you will arrange water procedures: water can turn a certain color. In this way, excess products that are not absorbed into the skin go away.
- Do not rub with a washcloth and do not use scrubs. Cleanse your skin with a soft shower gel, which includes a cream. When characteristic spots appear, the tan must be updated.
How long does tanning last
Often, tanning is washed off in contact with sea, chlorinated and fresh water. If you regularly use a washcloth after applying the composition, the tan will be washed off much faster, especially if it is applied in 1 layer. For these reasons, you must carefully choose a tool, giving preference to a professional series. Similar products can be bought in a specialized cosmetic store or directly in a beauty salon.
How to wash off tanning
- Take a hot bath with sea salt, then wipe your skin well with a washcloth. Next, use a coffee scrub: mix 100 g. thick with 60 gr. oily sour cream. Rub the skin for 15 minutes.
- If the previous remedy did not help, combine 100 gr. crushed sea salt, 70 ml. shampoo or shower gel, add 30 gr. regular body cream. Peel and leave the product for 5 minutes.
- Rinse off tanning with a regular tonic or makeup remover lotion. Apply it evenly on the skin with a cotton pad or hands, rub in a circular motion for 10 minutes.
- Prepare water with lemon. Squeeze juice from 2 citruses, dilute it with 100 ml. water. Dampen a cosmetic swab in the solution, leave for 15 minutes.
Before applying self-tanning, use a hard scrub made from cane sugar and honey. Carry out hair removal / depilation, a few hours before the procedure, take a hot bath with essential oils. Apply the composition one at a time, starting with the buttocks. Take care to have flushing components in case of unexpected results.
Video: how to apply tanning so that there are no spots


Submit